Experiments
with wood pellet firing.
By Joe Monty,
Good steaming coal is getting harder and harder to find at a reasonable price. Some recent ads for imported Welsh coal quoted prices that would make me reluctant to burn it if I actually bought any. Most engines require soft coal to steam adequately, and that is getting harder and harder to get in my area (Boston). Anthracite coal can be obtained more easily, but it burns too slowly for most engines to keep steam up during hard running. By comparison, wood pellets are available at about a half dozen places in the area, at a price that is competitive with coal or fuel oil. They come in 40 lb bags at about $4.50 a bag. The table below shows the relative price per BTU for oil, coal and wood pellets.
|
Oil |
|
pellets |
|
|
coal |
|
|
BTU/lb |
|
BTU/lb |
|
|
BTU/lb |
|
|
18311 |
|
8300 |
|
|
12500 |
|
|
BTU/Gal |
|
BTU/bag |
|
|
BTU/bag |
|
|
130046.5 |
|
332000 |
|
|
625000 |
|
|
price/gallon |
equivalent
price |
|
equivalent
price |
|||
|
|
|
40
lb bag |
per
ton |
|
50
lb bag |
per
ton |
|
1.00 |
|
2.55 |
127.65 |
|
4.81 |
192.24 |
|
1.10 |
|
2.81 |
140.41 |
|
5.29 |
211.46 |
|
1.20 |
|
3.06 |
153.18 |
|
5.77 |
230.69 |
|
1.30 |
|
3.32 |
165.94 |
|
6.25 |
249.91 |
|
1.40 |
|
3.57 |
178.71 |
|
6.73 |
269.13 |
|
1.50 |
|
3.83 |
191.47 |
|
7.21 |
288.36 |
|
1.60 |
|
4.08 |
204.23 |
|
7.69 |
307.58 |
|
1.70 |
|
4.34 |
217.00 |
|
8.17 |
326.81 |
|
1.80 |
|
4.60 |
229.76 |
|
8.65 |
346.03 |
|
1.90 |
|
4.85 |
242.53 |
|
9.13 |
365.25 |
|
2.00 |
|
5.11 |
255.29 |
|
9.61 |
384.48 |
|
2.10 |
|
5.36 |
268.06 |
|
10.09 |
403.70 |
|
2.20 |
|
5.62 |
280.82 |
|
10.57 |
422.93 |
|
2.30 |
|
5.87 |
293.59 |
|
11.05 |
442.15 |
|
2.40 |
|
6.13 |
306.35 |
|
11.53 |
461.37 |
|
2.50 |
|
6.38 |
319.12 |
|
12.01 |
480.60 |
|
2.60 |
|
6.64 |
331.88 |
|
12.50 |
499.82 |
|
2.70 |
|
6.89 |
344.65 |
|
12.98 |
519.05 |
|
2.80 |
|
7.15 |
357.41 |
|
13.46 |
538.27 |
|
2.90 |
|
7.40 |
370.18 |
|
13.94 |
557.49 |
|
3.00 |
|
7.66 |
382.94 |
|
14.42 |
576.72 |
At the volatile current fuel prices, there is a definite cost advantage relative to oil firing, and they are also a little cheaper than coal on a heating value basis. Also, since they are not hotly traded on the commodities market, the price tends to be more stable than for oil.
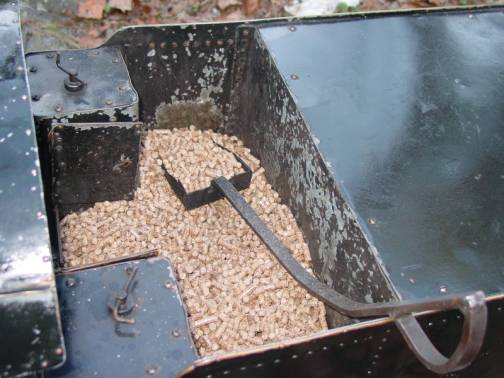
For those of you who have never seen them, pellets are a
manufactured product, typically from sawmill waste. A picture of my tender with
a load of them is shown in Figure 1.
Figure 1 – Tender load pf pellets
They are ¼ inch round and vary from ½ inch to 1 ½ inches long. Pellet stoves are highly engineered devices with a storage hopper for the pellets, a mechanical stoker, and a forced draft blower. The stoker looks like a miniature locomotive stoker and the parts could probably be pirated to work on a Live Steamer.
My initial attempt at burning pellets was far from satisfactory. While the engine steamed very well on the stuff, the smoke was literally blinding. Wood smoke is much more irritating to the eyes than coal smoke, to the point of being unbearable if you’re riding behind it. When the pellets burned down to embers, what was left went up the stack in a massive shower of sparks, which basically land on the engineer and can be quite painful.
Despite the problems, the idea of firing totally on pellets was still intriguing even after the initial experience. The increasing difficulty in getting coal has made it apparent that one of these days it will not be available at all, so there is a strong incentive to make pellets work as a primary fuel. Under ideal conditions, the stuff can burn very cleanly, and there is almost no ash. The question was how to adapt the locomotive to burn them without blinding the engineer or setting the woods on fire.
Wood pellets burn very differently from coal. The key difference between wood pellets and coal is that nearly all of the heat energy is tied up in the tars and gases. Once the gases burn off from the pellets there really isn’t much left. The problem is that a small firebox does not burn the gases efficiently. This is why the coals that are most suitable for small engines are low volatile bituminous or semi anthracite coals like Welsh coal, or Pocahontas.
Poor combustion efficiency in the case of wood pellets is what makes the smoke irritating. This is similar to what happens on an oil-burning engine if the burner settings are off. Unburned hydrocarbons in the smoke are the culprit in both cases. In order to fire pellets successfully, the grate and air inlets need to be designed to favor combustion of the gases. The other problem is the small size of the pellets. They fall through most grates that are sized for coal, and they release the gases so quickly because of their size that it is impossible to maintain a fire of any practical thickness without massive amounts of smoke. The thin fire will be quickly sucked up the stack when you open the throttle. The grate arrangement required to address these problems ends up being very different than for coal firing, to the point that it will not work with coal.
The wood pellet grate shown in figure 2 follows the practice used in pellet stoves. The arrangement I ended up with limits the actual grate area and amount of air coming under the fire, and directs about 1/3 of the air through overfire air jets. This provides secondary air and turbulent mixing to burn the gases effectively. Reducing the grate area permits the quantity of pellets needed cover the grate to be better matched to the amount of air being drawn through the firebox, and allows a firebed with practical thickness. Grate openings are drilled 5/16 holes, which are better matched to the size of the pellets, so they don’t fall through. Air space through the grate is also limited to force air through the over fire inlets and minimize lifting of the pellets off the grate to cut down on sparks. The improved combustion efficiency with this arrangement eliminates the irritating components in the smoke, provided the fireman is on the ball to maintain the right balance of fuel and draft.
The actual grates are only about 2” wide with 45-degree
sloping sidewalls to either side made from 2” flat stock. Because the firebed
is a lot cooler than with coal, plain hot rolled flat stock is an acceptable
grate material. A piece of 2”
angle iron runs down the center and divides the grate into two sections forming
a pair of troughs to hold the pellets.
3/8” holes are drilled along the tops of the sidewalls and center rail
to provide the over fire airflow.
Figure 3 shows a cross section of the arrangement and illustrates the principles behind it. The opposing air jets mix the secondary air thoroughly with the gases for complete combustion. The reason for the center rail is twofold. It helps to cut down on the grate area, and it also improves air mixing over just having the jets along the walls. On a wide firebox, the overfire air jets will not have enough energy to penetrate across the grate, so the areas near the wall will get too much air, and the area in the center will not get enough. The center rail injects air in the middle of the grate to provide a more uniform fuel and air mixture. This application is to a fairly wide firebox on a 1 1/2” scale Atlantic, which has a fairly generous grate area for burning coal. Figure 4 shows a picture of the action. The center rail and secondary air inlets are clearly visible in the picture.
Comparable experiments with a narrow firebox engine (A Little Engines C.P. Huntington – similar to their 4-4-0 American) gave a slightly different answer. Here, the smaller grate was much more highly loaded, airflow wise, so the full grate area was maintained, but an air duct was added to provide the overfire air, while more severely restricting the inlets on the grates. In this case, all of the secondary air injection was from the center.
This bears some resemblance to the Porta gas producer
firebox arrangement, and this is more than accidental.
In both cases, the objectives are to reduce lifting of burning fuel off
the grates, and improve gas combustion efficiency.
The difference is that in my case I have not used the steam injection
that Porta does, although it could easily be added as an experiment.
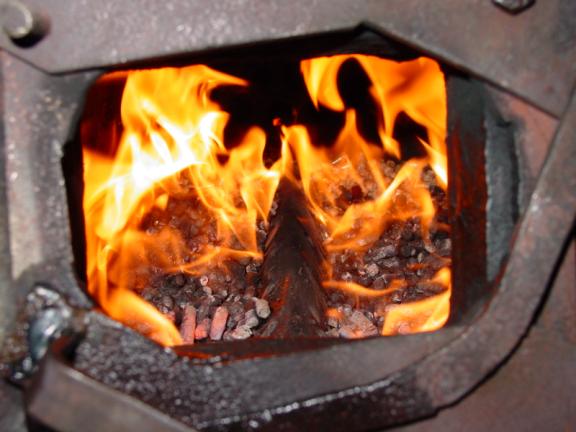 Figure 4 Fireman’s View of the
Action
Figure 4 Fireman’s View of the
Action
Firing with wood pellets is somewhat different from coal firing. People with PHD’s in coal firing (for “Piled High and Deep”) will probably have a bad experience until they get the hang of firing light. Pellet stoves are able to operate as cleanly as they do because they work with a continuous feed and constant fire setting. This is impossible to achieve in a locomotive with hand firing, but by tailoring one’s firing technique to approach this ideal condition, the best results will be obtained. A properly fired engine will operate very cleanly. Overfiring the engine doesn’t do any good for steaming because the excess only goes up the stack as eye burning smoke. If you fall behind in your firing you may lose steam, but you will also recover quickly once you add a couple of scoops to the fire.
Because the pellets have a third less heating value per pound, and are much less dense than coal, you will find yourself doing a lot of shoveling. This gets to be a nuisance to even the most dedicated fireman, and is why a stoker arrangement would be desirable as an addition.
Sparks, can still be a problem if you have any flammable brush around your track. While the grate design made the spark level tolerable on my Atlantic, I never entirely solved the problem on the smaller engine. In any case, a spark screen on the stack is strongly recommended, especially if there is any flammable brush near the track. Wood sparks stay live longer than coal cinders, and enough of them make it to the ground that there is cause for concern. Figure 5 shows my engine with the spark arrestor installed.
Even with a spark screen, driving the C.P. Huntington on pellets was like running the express train into Hell. Opening the throttle wide produced a wall of sparks to run into, which could be quite painful. This engine is significantly modified from the original plans with increased tube area and a high efficiency exhaust (basically a Lempor), and is also a conversion from oil firing. The result is that the small grate has a furious draft that sucks coffee bean sized chunks of coal up the stack at full throttle. It’s a challenge just keeping a coal fire on the grate, much less wood pellets. The situation may not be as severe on a standard Little Engines American type. I’m still working this one and may go to a full gas producer system.

Figure 5 Author’s Atlantic with Spark Arrestor
Another thing to keep in mind is that the pellets have to be kept dry. When they get wet, they expand to five times their original size before disintegrating into a pile of wet sawdust. Be careful not to get them wet when taking water. If it starts to rain, they have to be covered quickly, or you will have a soggy mess to clean out of the tender. You may want to consider making some sort of cover plate for the fuel bunker for when the weather turns suddenly.
Against these drawbacks is the fact that they are just very convenient. Startup and shutdown are almost as easy as oil firing. The rituals of starting a coal fire are greatly simplified. There is no need for oil soaked briquettes or scrap wood. The pellets light easily with a squirt of Diesel fuel and a match, and the embers are short lived and will burn out in a matter of minutes when you are done running. There is hardly any ash to speak of, and what little there is can be brushed through the grate prior to firing up. There are no clinkers and a rake is unnecessary. The most you may have to do in this area is level out the fire with the back of the shovel. Tubes require periodic brushing out, but a lot less than with most grades of coal, and there is never any tube plugging. Anything that gets sucked through the tubes either goes up the stack or burns out in the smokebox, so there is minimal ash and cinder accumulation in the smokebox. Overall, it is much cleaner than coal firing. Two bags of pellets ($8-$10 worth) are usually more than enough for a full day of hard running.
They are worth a try, but, as I have found, not every engine will be successful with them. They will keep steam up, but some engines will end up throwing excessive sparks when you use them.

The sketches show the pellet grate as fitted to a 1 ½” scale Little Engines
Atlantic. The design
has to be adapted to fit the firebox, so the intent of the sketches is to give
the builder an idea of how the size the key features. What is shown is pretty representative of a medium size 1 ½”
scale engine so the design should be adaptable to a lot of other engines.
All dimensions are subject to modification depending on the
characteristics of the engine it is being applied to.
Figure
6 Side Grate
Construction
Figure 6 Side Grate
Construction
The two grate sections are built up from 2” wide
hot rolled steel flat stock as shown in figure 6.
The bottom piece is ¼” thick stock, the side strip can be either ¼ or
1/8 stock. If you have a heavy-duty brake, it can also be bent up from
one piece of ¼” plate. The two
pieces are cut to the length of the firebox welded together along their lengths
at roughly a 135-degree angle. The angle can be made narrower to adjust the fit
to the firebox. The bottom strip is
drilled with three rows of 5/16” air holes on ¾” centers. The rows are staggered by ½ pitch to each other.
The side strip is drilled with 3/8” holes on a 1 ½ inch pitch.
This row should be as close to the outer edge as practical- usually
leaving a minimum of 1/8 inch of material to the edge.
If your boiler has a sloping backhead, the side strip will have to be
relieved as shown to match the slope of the door sheet, so this will make for a
left handed and right handed grate section.
It is important to have as close a fit as practical to the firebox to
prevent pellets from falling through around the edges, and to minimize air
admission along the side sheets. One
thing that will cause very poor steaming is an excessive gap at the side sheets,
as this will admit cold air along
the firebox walls, which does not participate effectively in the combustion
process and can actually isolate the walls from the flame.
All it does is take heat up the stack.
Figure 7 Center Rail Construction
The center rail is cut from 2” angle iron, as shown if figures 2 and 3, again to the length of the firebox, with the ends relieved to match the slope of the door sheet. In order to prevent the center rail from covering the holes in the mating grate sections it needs to be bent inward from a 90 degree angle to roughly a 60 degree angle. This can be done with a heavy-duty vise. This is purely an issue of fitup to the firebox you are putting this in, and it can also be addressed by varying the mating angle of the grate and side strips. A row of 3/8” holes is drilled along the top corner on each side of the center rail at a 1 ½” pitch so that they will oppose the holes in the side strips on the grate sections. A row of ¼” tuyere holes is drilled with a ¾” pitch along the bottom edges of the center rail. These supplement the air coming through the grate strips and provide agitation of the fire without lifting it off the grate.
Note that the sketches specify size and spacing of the holes, and not absolute numbers of holes. What we are after is inlet area per square inch of grate area, and the relative split of under fire and over fire hole area. These are the factors that should be maintained when scaling this design to a different engine.
Figure 8 Center Rail Hole Pattern
Two gusset plates are fitted and welded to the underside of the center rail. The purpose is to lock the center rail between the grate sections and also to hold the grate sections firmly against the side sheets. Grind to a snug fit with the grate sections.
The individual pieces are sized to fit through the firebox door of my engine, and sit on a pair of fixed cross bars at the bottom of the firebox. Different builders have different ways of installing and retaining the grates, and this requires nothing special compared to ordinary grates.
Firing Tips
Firing up is not much different from firing up with coal except everything lights easier. Fill the troughs in the grate with dry pellets up to the level of the overfire jets. Squirt in some kerosene or Diesel fuel, and place an oil soaked paper towel on top of the pellets under the door. Light off with a match, turn on the blower, and things pretty much take care of themselves. The initial load of pellets is usually enough to get the pressure gauge off the pin. Once the pellets start to burn down to embers just feed in a scoop at a time to maintain the fire. Transition from external blower to steam blower as you would with coal. Feed just enough pellets to maintain a light gray smoke.
Aim to keep as steady a fire as possible. Use the blower to control smoke when there is no exhaust draft, but not too much. Use frequent light firings and avoid piling it in all at once. If one follows these firing techniques, the smoke will be quite tolerable, and you should have no trouble maintaining pressure.
When you’re done, the fire will be out within 10 minutes of when you stop adding pellets, so there is no real need to dump the fire. Just rake what is left through the grates before blowing down. If you want to break for lunch, but keep the engine hot, let the fire burn down to almost nothing, then shovel in a deep bank at the back of the firebox, under the door, putting nothing on the forward 2/3 of the grate. Crack the blower and you should be good for a half hour.
There is some variation between pellets from different manufacturers, and you may have to adjust your firing technique a little to accommodate this. Remember that this is a processed waste product, and will reflect the type of wood the supplier works with for their primary product. The pelletizing process tends to reduce the differences seen in the comparable unprocessed wood, because it compresses things to a fairly uniform density and bakes out most of the moisture that would be retained in a log. Most local suppliers in New England sell hardwood-based pellets, because “pine” is a dirty word to local firewood connoisseurs. Pine based pellets do tend to be a little more smoky and the embers are a little shorter lived, but the difference is not really that much- both types work well. The key thing I have found is that the pine-based pellets tend to work better when one fires with a “heel” – keep the fire thick under the door and thin towards the tubes. Hardwood based pellets work better with a more level fire. These are minor differences compared to what I have seen between batches of coal.
Premium grade pellets are preferable as they are held to less than 1 percent ash. Lower grade pellets may be as high as 3% ash, and may cause clinkering problems. Lower grade pellets may contain a lot of tree bark, which will contain dirt and sand from the logs being dragged on the ground. Sand will fuse into glass inside a firebox, making clinkers. Pay the extra money for premium pellets. The price difference is only about 50 cents a bag, which is not worth any additional inconvenience.
I would like to think that I have presented a good starting point for other people in the hobby to improve on. There is certainly a lot more to be done with this. I think this is a fuel with a lot of potential for use in Live Steamers. The ideal solution for most engines would be a larger size pellet or briquette that is roughly walnut sized. These could be directly substituted for coal on conventional grates. If there is enough interest from the Live Steam community, it may be possible to persuade one or more pellet manufacturers to produce such a product. In the meantime it is possible to work with what is currently available. Hopefully we will see further innovation in this area by others in our hobby